Slient Plant

  • 首页

  • 关于

  • 标签

  • 归档

如何使用 Org 文档写 Hexo 博客

发表于 2019-02-13 | 更新于 2019-02-14 | 评论数:
本文字数: 8.3k | 阅读时长 ≈ 8 分钟
  • 1. Hexo 与 Org-mode
  • 2. hexo-renderer-org
  • 3. 配合使用 Hexo 的文章资源文件夹
  • 4. 配合 Hexo 主题: NexT
  • 5. 技巧
    1. Hexo 与 Org-mode
    2. hexo-renderer-org
  • 2.1. 安装
  • 2.2. 工作原理
  • 2.3. emacs 的配置
  • 2.4. hexo 的配置
  • 2.4.1. 不要使用 emacs htmlize 功能
  • 2.5. Enjoy
    3. 配合使用 Hexo 的文章资源文件夹
    4. 配合 Hexo 主题: NexT
    5. 技巧

1. Hexo 与 Org-mode

Hexo 是一个快速、简洁且高效的用于生成静态网页的博客框架, 生成的网页可以方便地托管到 Github Pages , 可以快速方便地创建个人博客.

Hexo 默认使用 Markdown 格式解析文章, 本文介绍如何使用 org 文档生成 Hexo 博客文章.

2. hexo-renderer-org

hexo-renderer-org 是 hexo 的一个插件, 用于将 org 文档生成 hexo 的博客文章. Hexo 解析 Markdown 文档的能力保持不变, 相当于给 Hexo 加上 org 文档的支持.

使用我维护的 hexo-renderer-org 项目1.

2.1. 安装

在 Hexo 博客文件夹下安装 hexo-renderer-org

npm install https://github.com/mpwang/hexo-renderer-org#master --save

2.2. 工作原理

安装了 hexo-renderer-org 之后, hexo 命令会使用 emacsclient 去连接 emacs server, 使 用 org export 功能将 org 文档转换成 html, 所以要求 emacs 开启 server 进程.

2.3. emacs 的配置

spacemacs 用户配置

启用 emacs server 进程以及设置 emacs server socket 文件所在的文件夹.

;; If non-nil, start an Emacs server if one is not already running.
;; (default nil)
dotspacemacs-enable-server t

;; Set the emacs server socket location.
;; If nil, uses whatever the Emacs default is, otherwise a directory path
;; like \"~/.emacs.d/server\". It has no effect if
;; `dotspacemacs-enable-server' is nil.
;; (default nil)
dotspacemacs-server-socket-dir "~/.emacs.d/server"

2.4. hexo 的配置

在 hexo 博客的配置文件 _config.yml 中添加

org:
  # 指定 emacs 执行文件路径
  emacs: '/usr/local/bin/emacs'
  # 指定 emacsclient 执行文件路径
  emacsclient: '/usr/local/bin/emacsclient'
  # 是否生成自动注脚, t 为开启, nil 为关闭
  common: |
    #+OPTIONS: html-postamble:nil
  clean_cache: true
  daemonize: true
  # emacs server file 路径, 如果不指定, 以下为默认值
  server_file: "~/.emacs.d/server/server"

2.4.1. 不要使用 emacs htmlize 功能

README 文档里的 htmlize 功能我没有成功过, 设置 htmlize: true 之后生成的内容会 出错. 不过这个问题影响不大, 代码高亮交给 highlight.js 去处理.

2.5. Enjoy

现在在开启 emacs 的情况下, 执行以下命令即可以享受用强大的 org-mode 写文档, 并生成 Hexo 博客.

hexo clean && hexo generate && hexo server --debug

3. 配合使用 Hexo 的文章资源文件夹

Hexo3 加入了文章资源文件夹 的支持, 文章相关的图片可以放在文章同名文件夹里面, 并使用以下代码引用图片

{% asset_img slug [title] %}

而在 org 文档中配合 org-download, 我们还可以实现更强大的功能. 在 Hexo 博客文件夹中创建 .dir-local.el, 添加以下代码

((nil .
((eval .
(progn

;; make drag-and-drop image save in the same name folder as org file
;; ex: `aa-bb-cc.org' then save image test.png to `aa-bb-cc/test.png'
(defun my-org-download-method (link)
(let ((filename
(file-name-nondirectory
(car (url-path-and-query
(url-generic-parse-url link)))
)
)

(dirname (file-name-sans-extension buffer-file-name ) ))

;; if directory not exist, create it
(unless (file-exists-p dirname)
(make-directory dirname))

;; return the path to save the download files
(expand-file-name filename dirname)))


;; only modify `org-download-method' in this project
(setq-local org-download-method 'my-org-download-method)

;;;;;;;;;;;;;;;;;;;;;;;;;;;;;;;;;;;;;;;;;;;;;;;;;;;;;;;;;;;;;;;
;; for using hexo config post_asset_folder: true ;;
;; https://hexo.io/docs/asset-folders.html#Post-Asset-Folder ;;
;;;;;;;;;;;;;;;;;;;;;;;;;;;;;;;;;;;;;;;;;;;;;;;;;;;;;;;;;;;;;;;

;; only modify `org-download-link-format' in this project
(setq-local org-download-link-format "{%% asset_img %s %%}")

;; only modify `org-download-abbreviate-filename-function' in
;; this project
(setq-local org-download-abbreviate-filename-function #'file-name-nondirectory)
))
)
)
)

现在你可以将图片支持拖拽到 org 文档中, emacs 会自动创建文章同名文件夹并异步下载图片, 在光标所在处自动插入对应的引用代码.

使用本功能必须配置 org 文档导出时忽略 _ 字符的处理, 否则处理 asset_img 时会引起报错.

(with-eval-after-load 'ox
;;;;;;;;;;;;;;;;;;;;;;;;;;;;;;;;;;;;;;;;;;;;;;
;; disable interpret "_" and "^" for export ;;
;;;;;;;;;;;;;;;;;;;;;;;;;;;;;;;;;;;;;;;;;;;;;;
(setq org-export-with-sub-superscripts nil))

4. 配合 Hexo 主题: NexT

本网站采用了漂亮成熟的主题 NexT 6.0.

以下是我使用 hexo-renderer-org 配合 NexT 主题的的一些调优.

spacemacs 用户配置

使用方式: 在 .spacemacs 文件的 dotspacemacs/user-config 中添加

(load "~/.emacs.d/config-hexo.el")

在 ~/.emacs.d/ 文件夹中创建 config-hexo.el 添加以下代码

;;;;;;;;;;;;;;;;;;;;;;;;;;;;;;;;;;;;;;;;;;;;;;;;;;;;;;;;;;;;;;;;;;;;;;;;;;;;;;;;;
;; customization for using hexo-renderer-org to generate hexo static web pages ;;
;; ;;
;; using themes/next https://theme-next.org/ ;;
;;;;;;;;;;;;;;;;;;;;;;;;;;;;;;;;;;;;;;;;;;;;;;;;;;;;;;;;;;;;;;;;;;;;;;;;;;;;;;;;;

(defun hexo-theme-next/link-add-font-awesome (text backend info)
"Add fa-external-link class to element."
(let ((fa-external-element ""))
(when (and (eq backend 'hexo-html)
(not (string-match-p fa-external-element text)))

(replace-regexp-in-string "" (concat " " fa-external-element) text)
))
)


(defun hexo-theme-next/center-quote (text backend info)
"Transcode a CENTER-BLOCK from org to hexo theme/next centerquote tag plugin."
(let ((blockquote-tag-start "
"
)

(blockqoute-tag-end ""))

(when (and (eq backend 'hexo-html)
(not (string-match-p blockquote-tag-start text)))

(let* ((result text)
(result (replace-regexp-in-string "
"
blockquote-tag-start result)
)

(result (replace-regexp-in-string "
" blockqoute-tag-end result)))
result))))

(with-eval-after-load 'ox
;;;;;;;;;;;;;;;;;;;;;;;;;;;;;;;;;;;;;;;;;;;;;;
;; disable interpret "_" and "^" for export ;;
;;;;;;;;;;;;;;;;;;;;;;;;;;;;;;;;;;;;;;;;;;;;;;
(setq org-export-with-sub-superscripts nil)

(add-to-list 'org-export-filter-link-functions #'hexo-theme-next/link-add-font-awesome)
(add-to-list 'org-export-filter-center-block-functions #'hexo-theme-next/center-quote)
)


(with-eval-after-load 'ox-html
;;;;;;;;;;;;;;;;;;;;;;;;;;;;;;;;;;;;;;;;;;;;;;;;;
;; todo keyword use theme/next label CSS class ;;
;;;;;;;;;;;;;;;;;;;;;;;;;;;;;;;;;;;;;;;;;;;;;;;;;
(setq org-html-todo-kwd-class-prefix "label warning ")

(setq org-html-postamble-format
'(("en"
"

Generated using %c

"
)

))

;;;;;;;;;;;;;;;;;;;;;;;;;;;;;;;;;;;;;;;;;;;;;;;;;;;;;;;;;;;;;;;;;;;;;;;;;;
;; generate TOC using hexo theme/next tabs plugin at the top of article ;;
;; ;;
;; redefine org-html-toc ;;
;;;;;;;;;;;;;;;;;;;;;;;;;;;;;;;;;;;;;;;;;;;;;;;;;;;;;;;;;;;;;;;;;;;;;;;;;;
(defun org-html-toc (depth info &optional scope)
"Build a table of contents.
DEPTH is an integer specifying the depth of the table. INFO is
a plist used as a communication channel. Optional argument SCOPE
is an element defining the scope of the table. Return the table
of contents as a string, or nil if it is empty."

(let ((toc-entries
(mapcar (lambda (headline)
(cons (org-html--format-toc-headline headline info)
(org-export-get-relative-level headline info)))

(org-export-collect-headlines info depth scope)))
)

(when toc-entries
(let ((toc (concat "
    \n"

(hexo-theme-next/toc-nav-tabs toc-entries)
""
"
\n"

(hexo-theme-next/toc-text toc-entries)
"
\n"
)))
(if scope toc
(concat "
\n"

toc
"
\n" ))
))))

(defun hexo-theme-next/get-href (headline)
(if (string-match "href=\"#\\(.*\\)\"" headline)
(match-string-no-properties 1 headline)
""))


(defun hexo-theme-next/toc-nav-tabs (toc-entries)
(mapconcat
(lambda (entry)
(let ((headline (car entry))
(level (cdr entry)))

(when (= level 1)
(let ((ahref (hexo-theme-next/get-href headline)))
(concat "
  • \n"

  • (replace-regexp-in-string
    "
    "
    (replace-regexp-in-string ahref (concat "tab-" ahref) headline))

    "\n"))
    )
    )
    )

    toc-entries ""))


    (defun hexo-theme-next/toc-text (toc-entries)
    "Return innards of a table of contents, as a string.
    TOC-ENTRIES is an alist where key is an entry title, as a string,
    and value is its relative level, as an integer."

    (let* ((prev-level (1- (cdar toc-entries)))
    (start-level prev-level))

    (concat
    (mapconcat
    (lambda (entry)
    (let ((headline (car entry))
    (level (cdr entry)))

    (let ((ahref (hexo-theme-next/get-href headline )))
    (concat
    (let* ((cnt (- level prev-level))
    (times (if (> cnt 0) (1- cnt) (- cnt))))

    (setq prev-level level)
    (if (> cnt 0)
    (cond ((= level 1)
    (format "
    \n
      \n"

    (concat "tab-" ahref)))

    ((> level 1)
    "
  • \n"
  • )
    )

    (cond ((= level 1)
    (format "\n
    \n
    \n
      \n"
      (concat "tab-" ahref)))
      ((> level 1)
      "\n
    • \n"
    • )
      )
      ))
      headline))))
      toc-entries "")
      "
    "
    )))
    )
      功能
    hexo-theme-next/link-add-font-awesome 将所有链接后插入 font awesome 箭头图标
    hexo-theme-next/center-quote 将 org 的 #+BEGIN_CENTER 代码块转换为 NexT 的 centerquote 标签
    org-html-todo-kwd-class-prefix 给标题中的 TODO 关键字加上 NexT 的 label 样式
    org-html-postamble-format 配合 _config.yml 中 postamble:t 使用, 自动在文章末尾加上 Generated 文字
    org-html-toc 将文章开头 org 自动生成的 Table of Content 转换成 NexT 漂亮的 tabs 标签

    5. 技巧

    有时候需要直接在 org 文档中包含 hexo 特殊标签字符时会 hexo g 会出错, 或者输出会消失, 比如本文中的 {%% asset_img %%} {% asset_img %} .

    这是因为这些字符会被 Hexo 引擎特殊处理, 当你需要输出这些特殊字符, 可以在外面用 raw 标签包围, 这样 hexo 引擎就不会处理这些字符了.

    {% raw %}
    {% asset_img %}
    {% endraw %}

    Footnotes:

    1

    hexo-renderer-org 最早是 coldnew 开发的, 但是已经停止维护了,emacs 升级到 26.1 之后不能使用.

    MephistoMMM 修复了问题, 我自己 fork 之后又修复了几个问题, 目前已经可以稳定使用.

    Generated using Emacs 29.0.50 (Org mode 9.4.6)

    org 文档使用 ob-ipython 进行 python literal programming

    发表于 2019-02-07 | 更新于 2019-02-10 | 评论数:
    本文字数: 2.8k | 阅读时长 ≈ 3 分钟
    • 1. ob-ipython
    • 2. 安装
    • 3. 配置
    • 4. 使用 yasnippet
    • 5. 显示图片及表格
    • 6. Enjoy
      1. ob-ipython
      2. 安装
    • 2.1. 安装 ob-ipython
    • 2.2. 安装 jupyter
    • 2.2.1. 手动安装 jupyter
    • 2.2.2. 使用 use-package
      3. 配置
      4. 使用 yasnippet
      5. 显示图片及表格
      6. Enjoy

    1. ob-ipython

    使用 ob-ipython 可以在 org 文档内运行代码块, 代码块内容会被发送到后台的 Jupyter 进程运行, 返回结果会被插入到 org 文档中. org 文档丰富的显示类型使得使 用 org 文档来代替 jupyter notebook 成为了一种不错的体验.

    效果图

    2. 安装

    以下指引针对 spacemacs 用户, 其它配置的用户需要在自己的配置中添加对应的设置.

    2.1. 安装 ob-ipython

    在 dotspacemacs-additional-packages 中添加 ob-ipython.

    SPC f e R 重新载入 spacemacs 配置或者重启 spacemacs 下载安装 ob-ipython.

    2.2. 安装 jupyter

    2.2.1. 手动安装 jupyter

    python3 安装 jupyter

    pip3 install jupyter

    2.2.2. 使用 use-package

    在 dotspacemacs/user-config 中添加

    (use-package use-package-ensure-system-package
    :ensure t)

    (use-package ob-ipython
    :ensure-system-package ((jupyter . "pip3 install jupyter")))

    使用 use-package 的 use-package-ensure-system-package 功能, 如果系统 PATH 中没有 jupyter, 自动运行下载命令.

    SPC f e R 重新载入 spacemacs 配置.

    3. 配置

    在 dotspacemacs/user-config 中添加

    ;; 设置 python 解析器路径
    (setq python-shell-interpreter "/usr/local/bin/python3")

    (with-eval-after-load 'org
    (add-to-list 'org-babel-load-languages '(ipython . t))
    ;; 不再询问是否允许执行代码块
    (setq org-confirm-babel-evaluate nil)
    ;; display/update images in the buffer after I evaluate
    (add-hook 'org-babel-after-execute-hook 'org-display-inline-images 'append)
    )

    4. 使用 yasnippet

    使用 yasnippet 帮助你快速的创建 ipython 代码块.

    打开 org 文档, 点击菜单 YASnippet New snippet, 粘贴以下内容, 保存.

    # -*- mode: snippet -*-
    # name: ipython block
    # key: srcip
    # --
    #+BEGIN_SRC ipython :session ${1::ipyfile ${2:$$(let ((temporary-file-directory "./")) (make-temp-file (concat (file-name-sans-extension (file-name-nondirectory buffer-file-name)) "-py") nil ".png"))} }:exports ${3:both} :results raw drawer
    $0
    #+END_SRC

    现在你可以在 org 文档中输入关键字 srcip 然后使用 M-/ 自动扩展, 然后连续按 下 TAB 自动生成类似以下的代码

    #+BEGIN_SRC ipython :session :ipyfile /Users/mpwang/org/test-py9bDtND.png :exports both :results raw drawer
    
    #+END_SRC

    假设你的 org 文件名为 test.org, 如果你的代码块会生成图片, 这段代码会自动创建随 机生成的以 test 开头的文件名 test-py9bDtND.png 保存图片.

    5. 显示图片及表格

    ipython startup files

    设置 ipython startup 文件让 org 文档显示图片以及表格

    在 ~/.ipython/profile_default/startup 中添加 ob-ipython.py 文件, 插入以下内容, 保存.

    import IPython
    from tabulate import tabulate

    class OrgFormatter(IPython.core.formatters.BaseFormatter):
    def __call__(self, obj):
    try:
    return tabulate(obj, headers='keys',
    tablefmt='orgtbl', showindex='always')
    except:
    return None

    ip = get_ipython()
    ip.display_formatter.formatters['text/org'] = OrgFormatter()

    6. Enjoy

    现在你已经可以在 org 文档代码块中使用 C-c C-c 执行 python 代码并且可以在 org 文档中漂亮地显示图片以及表格了.

    Emacs Rocks!

    Generated using Emacs 29.0.50 (Org mode 9.4.6)

    spacemacs 与 org-mode 配置与使用技巧

    发表于 2019-02-06 | 更新于 2019-02-11 | 评论数:
    本文字数: 6.8k | 阅读时长 ≈ 6 分钟
    • 1. Spacemacs 配置
    • 2. Spacemacs 美化
    • 3. Spacemacs 使用技巧
    • 4. org-mode 使用技巧
      1. Spacemacs 配置
    • 1.1. 使用中国镜像
    • 1.2. 配置代理
    • 1.3. 使用 spacelpa
      2. Spacemacs 美化
    • 2.1. 字体
    • 2.2. 字体: 使用 cnfonts 配置中英文对齐
    • 2.2.1. 安装
    • 2.2.2. 配置
    • 2.2.3. 设置中英文对齐
    • 2.3. TODO 主题: doom-themes
    • 2.4. TODO solaire-mode:
    • 2.5. mode line 显示时间
      3. Spacemacs 使用技巧
    • 3.1. 导航: 使用 avy
    • 3.2. 搜索: 使用 helm-swoop
    • 3.3. 搜索: 使用外部工具搜索文件
      4. org-mode 使用技巧
    • 4.1. org-mode 配置重要提示
    • 4.2. 中英文之间自动插入空格
    • 4.3. 运行 shell 命令, 不需要离开 emacs
    • 4.4. 关闭图片显示
    • 4.5. 转义
    • 4.5.1. #+BEGIN_SRC 转义
    • 4.5.2. org-table 中转义 | 字符

    1. Spacemacs 配置

    Spacemacs 集合了 emacs 社区的努力, 为 emacs 提供一个成熟稳定, 开箱即用的 emacs 配置做了相当好的工 作. 个人使用 Spacemacs 也有相当一段时间, 以下是一些配置 Spacemacs 的 tips.

    1.1. 使用中国镜像

    在 dotspacemacs/user-init 中添加 melpa 中国镜像

     ;; melpa china mirrors
    (setq configuration-layer--elpa-archives
    '(("melpa-cn" . "http://mirrors.tuna.tsinghua.edu.cn/elpa/melpa/")
    ("org-cn" . "http://mirrors.tuna.tsinghua.edu.cn/elpa/org/")
    ("gnu-cn" . "http://mirrors.tuna.tsinghua.edu.cn/elpa/gnu/")))

    1.2. 配置代理

    连接国外的软件源由于网络问题, 通常较慢. 可以在 dotspacemacs/user-init 中设置代理

    ;; proxy
    (setq url-proxy-services '(("no_proxy" . "127.0.0.1")
    ("http" . "127.0.0.1:1087")
    ("https" . "127.0.0.1:1087")
    ))

    1.3. 使用 spacelpa

    spacemacs develop 分支特性

    • emacs version: 26.1
    • spacemacs develop version: 0.300

    emacs26 下载 spacelpa 会遇到问题 , 提前手动下载好 spacelpa 文件跳过自动下载及解压的步骤 (refer ).

    mkdir ~/.emacs.d/.cache/stable-elpa/26.1
    cd ~/.emacs.d/.cache/stable-elpa/26.1
    wget https://github.com/syl20bnr/spacelpa/archive/v0.300.tar.gz -O spacelpa-0.300.tar.gz
    tar -xzvf spacelpa-0.300.tar.gz
    echo -n "0.300" > version

    .spacemaces 设置

    dotspacemacs-use-spacelpa t

    SPC f e R 或者重启 emacs

    2. Spacemacs 美化

    2.1. 字体

    Table 1: 编程字体, 等宽中文字体以及不常见汉字字体
      font family name
    Iosevka (Source Code Pro Style) "Iosevka SS09"
    Sarasa Gothic (更纱黑体) "等距更纱黑体 SC"
    花園明朝 "HanaMinB"
    • 安装所有字体 iosevka-ss09-2.1.0.zip
    • 安装所有 sarasa-gothic-sc-*.ttf 字体

    配置字体

    dotspacemacs-default-font '("Iosevka SS09"
    :size 16
    :weight normal
    :width normal)

    2.2. 字体: 使用 cnfonts 配置中英文对齐

    使用 org-table 时中英文混排时字体需要对齐, 使用 cnfonts 项目解决这一问题.

    2.2.1. 安装

    dotspacemacs-additional-packages 中添加 cnfonts

    2.2.2. 配置

    dotspacemacs/user-config 中添加

    ;; Chinese and English fonts alignment
    (use-package cnfonts
    :config
    (cnfonts-enable)
    (setq cnfonts-use-face-font-rescale t)
    )

    上面的 (setq cnfonts-use-face-font-rescale t) 用于设置不同标题中文字体大小不同 , 比如 emacs 自带的 lenven 主题就支持这一特性.

    2.2.3. 设置中英文对齐

    M-x cnfonts-edit-profile

    执行之后先不要进行任何操作, SPC f f 打开 ~/.emacs.d/cnfonts/v4/profile1.el 编辑文件, 在 cnfonts--custom-set-fontnames 的三行中的第一位分别加入已经安 装的字体.

    示例

    (setq cnfonts--custom-set-fontnames
    '(("Iosevka SS09" "Ubuntu Mono" "DejaVu Sans Mono")
    ("等距更纱黑体 SC" "Ubuntu Mono" "隶书" "新宋体")
    ("HanaMinB" "SimSun-ExtB" "MingLiU-ExtB")))


    (setq cnfonts--custom-set-fontsizes
    '(
    (14 14.0 14.0)
    (16 16.0 16.0)
    (18 18.0 18.0)
    (20 20.0 20.0)
    (22 22.0 22.0)
    (24 24.0 24.0)
    (26 26.0 26.0)
    (28 28.0 28.0)
    (30 30.0 30.0)
    (32 32.0 32.0)
    ))

    再次执行 M-x cnfonts-edit-profile, 按照教程设置中英文对齐.

    重启 emacs 后如果发现字体大小在载入 cnfonts 之后有改变, 应该是 profile 载入 设置的问题. 检查 ~/.emacs.d/cnfonts/cnfonts.conf

    (nil)(("profile1" . 2))

    设置好最后的数字, index 从 1 开始. 使默认字体大小与 cnfonts--custom-set-fontsizes 中选择的配置相同. 如果 dotspacemacs-default-font :size 为 14, 在这里的应该设置为 1.

    2.3. TODO 主题: doom-themes

    2.4. TODO solaire-mode:

    2.5. mode line 显示时间

    在 MacOS 全屏显示下可以方便地查看当前时间

    (display-time-mode t)

    3. Spacemacs 使用技巧

    3.1. 导航: 使用 avy

    avy Github

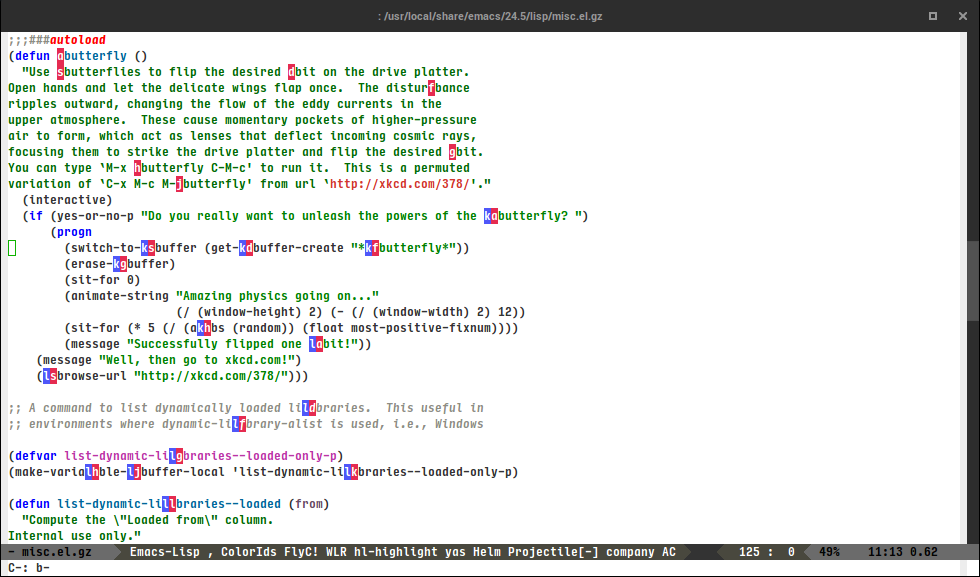
    不要再使用重复按 C-n C-p 在当前文件在移动光标到目标位置了. 使用 evil-avy-goto-char. 首先眼睛看准目标位置, 然后按下 SPC j j. 跟着提示的字符 按下按键直接跳转到目标位置.

    Table 2: avy 按键绑定
    命令 spacemacs 按键绑定 功能
    avy-goto-char SPC j j 跳转到字符
    avy-goto-word SPC j w 跳转到单词
    avy-goto-line SPC j l 跳转到行

    avy-goto-char 示例

    3.2. 搜索: 使用 helm-swoop

    helm-swoop Github

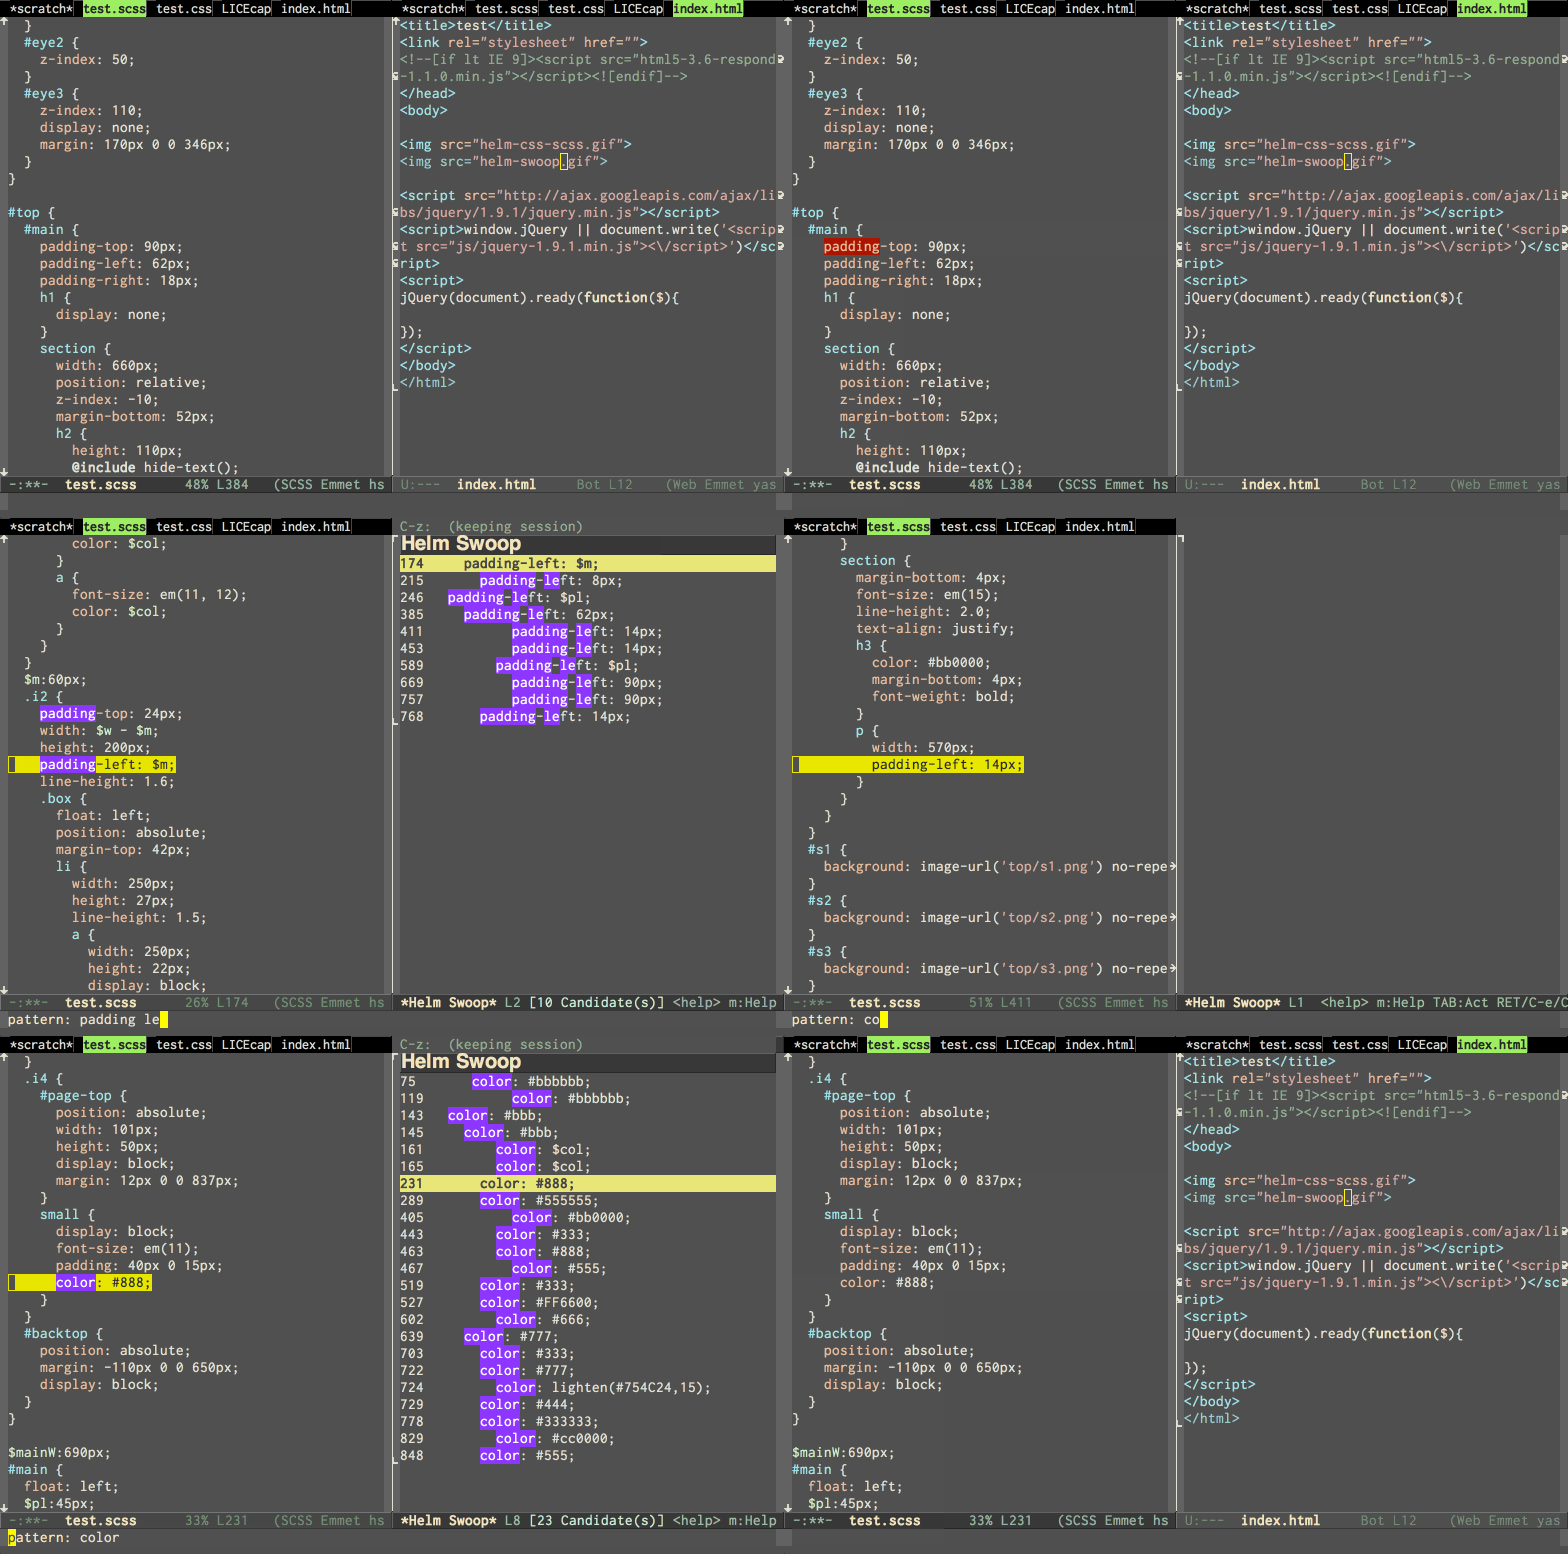
    不再重复地按 C-s 在当前文件中进行搜索, C-s 只适合简单的搜索场景. 使用 helm-swoop 进行预览式搜索.

    Table 3: helm-swoop 按键绑定
    Key binding Description
    SPC s s execute helm-swoop
    SPC s S execute helm-multi-swoop
    SPC s C-s execute helm-multi-swoop-all

    示例

    3.3. 搜索: 使用外部工具搜索文件

    spacemacs develop 分支特性: rg (ripgrep) 支持

    仅仅搜索当前 buffer 内容是不够的, spacemacs 可以使用

    • rg (ripgrep)
    • ag (the silver searcher)
    • pt (the platinum searcher)
    • ack

    等工具进行文件搜索. 如果以上的工具都找不到, spacemacs 就会调用 grep.

    dotspacemacs-search-tools, the default order is rg, ag, pt, ack then grep

    spacemacs 会按照系统路径中找到以上工具的顺序, 使用统一的界面进行调用.

    推荐 Linux/MacOS 使用 ripgrep (super bleeding fast!), windows 用户使用 pt.

    更多使用请查看 searching

    Table 4: helm search 按键绑定
    按键绑定 功能
    SPC / or SPC s p search project
    SPC / or SPC s d search current directory
    SPC s f search in arbitrary directory

    4. org-mode 使用技巧

    4.1. org-mode 配置重要提示

    spacemacs 使用 org ELPA 仓库中的版本, 而不是 emacs 自带的 org.

    所有与 org-mode 相关的配置都需要放在 with-eval-after-load 代码块中 , 否则会载 入 emacs 自带的 org 版本, 造成版本冲突从而引起各种奇怪的 org-mode 相关的报错.

    (with-eval-after-load 'org
    ;; here goes your Org config :)
    ;; ....
    )

    4.2. 中英文之间自动插入空格

    pangu-spacing Github

    在 dotspacemacs-additional-packages 中加入 pangu-spacing, SPC f e R 自动下载安装.

    dotspacemacs/user-config 中加入配置

    (use-package pangu-spacing
    :config
    (global-pangu-spacing-mode 1)
    ;; only insert real whitespace in some specific mode, but just add virtual space in other mode
    (add-hook 'org-mode-hook
    '(lambda ()
    (set (make-local-variable 'pangu-spacing-real-insert-separtor) t)))

    )

    4.3. 运行 shell 命令, 不需要离开 emacs

    有时在写文档时需要查看某些 shell 命令的运行结果, 运行简单的单个命令并不需要离开 emacs, 可以在写文档时带来更好的体验.

    比如在写 markdown 文档时, 使用 vmd 预览效果, 只需要 M-! vmd README.md 即可.

    M-x shell-command 可以运行 shell 命令并在 minibuffer 中显示命令输出.

    M-x shell-command-on-region 可以将当前选中内容作为输入运行外部 shell 命令, 在 minibuffer 中显示命令输出. 运行前加上 C-u 可以选择将命令输出替换当前选中内容.

    Table 5: Running Shell Commands from Emacs
    按键绑定 命令
    M-! shell-command
    M-| shell-command-on-region
    C-u M-| shell-command-on-region, replace region with output

    4.4. 关闭图片显示

    在 org 文档插入图片后 emacs 会默认渲染图片. 在确认插入图片成功后, 编辑文本时图片会占用 大量空间. 我们通常在编辑时会想关闭图片显示.

    Table 6: 切换图片显示
    M-x org-toggle-inline-images C-c C-x C-v

    4.5. 转义

    在需要转义字符时, 记住被包围在 * / _ = + 之间的内容特殊字符大部分都 不会被解析.

    4.5.1. #+BEGIN_SRC 转义

    #+BEGIN_SRC org 文档会特殊解析, 有时候代码例子中需要原样输出时, 使用 ,# 进行转义.

    #+begin_src
    ,#+begin_src
    ,#+end_src
    #+end_src

    4.5.2. org-table 中转义 | 字符

    需要在 or-table 中输出 | 字符时使用

    \vert{}

    进行转义.

    Generated using Emacs 29.0.50 (Org mode 9.4.6)

    更换 ox-reveal 为 org-re-reveal

    发表于 2019-02-04 | 更新于 2019-10-20 | 评论数:
    本文字数: 1.5k | 阅读时长 ≈ 1 分钟
    • 1. 问题
    • 2. 解决方法
      1. 问题
      2. 解决方法
    • 2.1. spacemacs 用户

    1. 问题

    使用 Spacemacs 更新依赖包之后, org-mode 更新至 9.2 版本. org-structure-template-alist 的结构定义发生了变化, ox-reveal 的源码与 Org 9.2 不兼容.

    打开 org 文件出现以下的错误:

    In Org 9.2 the format was changed from something like

    ("s" "#+BEGIN_SRC ?\n#+END_SRC") to something like

    ("s" . "src")

    ox-reveal Original issue

    2. 解决方法

    ox-reveal 项目已经很久没有更新了, 看起来应该没有再维护了.

    ;; Register auto-completion for speaker notes.
    (when org-reveal-note-key-char
    (add-to-list 'org-structure-template-alist
    (list org-reveal-note-key-char "#+BEGIN_NOTES\n\?\n#+END_NOTES")))


    ;; needs to be updated as

    ;; Register auto-completion for speaker notes.
    (when org-reveal-note-key-char
    (add-to-list 'org-structure-template-alist
    (cons org-reveal-note-key-char "NOTES")))

    直接的解决方法更换 ox-reveal 为 org-re-reveal

    2.1. spacemacs 用户

    将 org-re-reveal 添加到 dotspacemacs-additional-packages

    在 dotspacemacs/user-config 中添加

    (with-eval-after-load 'org
    (require 'org-re-reveal)
    (setq org-re-reveal-root "file://path-to-reveal.js")
    )

    2019-10更新

    org layer 已经将原来的 org-reveal 更新为 org-re-reveal. 只需在 .spacemacs 中开启即可.

    在 dotspacemacs/layers 中设置

    dotspacemacs-configuration-layers
    '(
    (org :variables
    org-enable-github-support t
    org-enable-reveal-js-support t)
    )

    在 dotspacemacs/user-config 中设置

    (with-eval-after-load 'org
    (require 'org-re-reveal)
    (setq org-re-reveal-root "file://"))

    Generated using Emacs 29.0.50 (Org mode 9.4.6)

    How to easily replace host:port of a url in Python

    发表于 2018-12-31 | 更新于 2019-02-09 | 评论数:
    本文字数: 207 | 阅读时长 ≈ 1 分钟

    for python3

    1
    2
    3
    4
    5
    6
    7
    from urllib.parse import urlparse

    url = "http://example.com/about"
    parsed = urlparse(a)
    parsed = parsed._replace(netloc="localhost:8000").geturl()
    print(parsed)
    # 'http://localhost:8000/about'
    123…5
    Randall Wang

    Randall Wang

    Just another coder . Heavy Emacs user

    22 日志
    16 标签
    RSS
    GitHub
    0%
    © 2022 Randall Wang
    由 Hexo 强力驱动 v3.8.0
    |
    主题 – NexT.Gemini v7.0.0