Slient Plant

  • 首页

  • 关于

  • 标签

  • 归档

SQLAlchemy 使用自定义 Query 类

发表于 2018-05-26 | 评论数:
本文字数: 3.6k | 阅读时长 ≈ 3 分钟

Session.query_property

在 SQLAlchemy 中可以使用 session 的方法query_property方便的使用自定义的 query 类 [1].

以下是官方的示例代码

1
2
3
4
5
6
7
Session = scoped_session(sessionmaker())

class MyClass(object):
query = Session.query_property()

# after mappers are defined
result = MyClass.query.filter(MyClass.name=='foo').all()

query_property接收一个参数cls, 指定自定义的Query class (用户从sqlalchemy.orm.Query继承的子类), 而不是默认的Query.

示例

1
2
3
4
5
6
7
8
9
10
from sqlalchemy.orm import Query

class MyClassQuery(Query):
pass

class MyClass(object):
query = Session.query_property(cls=MyClassQuery)

# after mappers are defined
assert isinstance(MyClass.query, MyClassQuery)

以上的方法可以完成一些基本的需求, 但是问题是MyClass.query的类定义时和Session耦合在一起了.

假如我想使用自定义的Query类, 使用query构造出查询条件后,需要应用到不同的session上 (也许几个session代表不同的数据库连接), 这就要求My Class.query在定义时需要与 Session解耦, 最后使用query.with_session方法将query绑定到session上应用查询.

自定义Query类, 与Session解耦

1
例子使用了__init_subclass__方法, 要求python3.6+. 3.6之前的版本需要进行相应的修改.
1
2
3
4
5
6
7
8
9
10
11
12
13
14
15
16
17
18
19
20
21
22
23
24
25
26
27
28
29
30
31
32
33
34
35
36
37
38
39
40
41
42
43
44
45
46
47
48
49
50
51
52
53
54
55
56
57
58
59
60
61
62
63
64
65
66
67
68
69
70
71
72
73
74
75
76
77
78
79
80
81
82
83
84
85
86
87
88
89
90
91
92
93
from sqlalchemy import (
Column,
String,
Integer,
and_,
orm,
create_engine
)
from sqlalchemy.ext.declarative import declarative_base
from sqlalchemy.orm import scoped_session, sessionmaker
from sqlalchemy.orm.base import class_mapper, exc as orm_exc


class BaseQuery(orm.Query):

def __call__(self, with_default=False, **kwargs):
model_cls = self._mapper_zero().class_
if with_default:
filters = model_cls._default_filters()
if filters is not None:
self = self.enable_assertions(False).filter(filters)
return self


class UserQuery(BaseQuery):
pass


class QueryPropertyMixin:
query_cls = BaseQuery
query: BaseQuery = None

@classmethod
def _default_filters(cls):
pass

@staticmethod
def _query_property(query_cls):

class query(object):
def __get__(self, instance, owner):
try:
mapper = class_mapper(owner)
if mapper:
# custom query class
return query_cls(mapper)
except orm_exc.UnmappedClassError:
return None

return query()

def __init_subclass__(cls, **kwargs):
cls.query = QueryPropertyMixin._query_property(cls.query_cls)


Base = declarative_base()


class User(Base, QueryPropertyMixin):
__tablename__ = 'users'

query_cls = UserQuery

@classmethod
def _default_filters(cls):
return and_(
cls.name != None,
cls.fullname != None
)

id = Column(Integer, primary_key=True)
name = Column(String)
fullname = Column(String)
password = Column(String)


engine = create_engine('sqlite:///:memory:', echo=False)

Session = scoped_session(sessionmaker(bind=engine))

session = Session()
Base.metadata.create_all(engine)

session.add(User(id=1, name='name', fullname='fullname'))
session.commit()

assert isinstance(User.query, UserQuery)

record = User.query.filter_by(id=1).with_session(session).one()
assert record.id == 1

query_str = User.query(with_default=True)
assert str(query_str).find('User.name IS NOT NULL')

首先定义自己的Query继承关系, BaseQuery继承orm.Query, 每个model如果需要有自己的特定查询类则继承BaseQuery. 在User中使用query_cls指定特定的查询类, 不定义则使用默认的BaseQuery.

核心点在于User模型继承了QueryPropertyMixin, 在QueryPropertyMixin使用了__init_subclass__方法控制子类在初始化时生成query对象.这样User.query对象就与session解耦, 在之后就使用with_session与具体session绑定进行查询了.

例子中还演示了如何在model类定义中一个default_filters, 代表某些情况中需要使用的 filters, 方便查询特定条件的对象.

  1. SQLAlchemy session query_property ↩

Mac High Sierra 彻底删除bootcamp分区

发表于 2018-05-05 | 评论数:
本文字数: 8.7k | 阅读时长 ≈ 8 分钟

bootcamp 无法删除 Windows 10分区

很久之前在Mac上使用bootcamp安装了windows10, Mac升级到10.13.4 High Sierra之后发现自己几乎没用过win10. 于是想删除bootcamp分区, 理想情况下使用bootcamp助理应该可以无痛删除win10分区. 然而mac在升级之后应该是使用了新的文件系统格式APFS.

打开bootcamp助理后, 提示错误: 启动磁盘不能被分区或恢复成单个分区, 无法继续.

官方说明: 将 Boot Camp 升级到 Windows 8.1 或更高版本时,您可能会看到一则警告信息“启动磁盘不能被分区或恢复成单个分区”。

于是开始折腾. 在没有做数据备份的情况下, 一路有惊无险, 记录解决过程如下.

1
警告:磁盘操作具有破坏性、高风险,建议操作前做好备份. 你必须十分清楚自己在做什么.

分区情况

找开磁盘工具查看分区表, 这里借用网上找到的一张图片, 操作之前没有截图.

分区

我的情况是除了mac APFS分区顺时针有一个8G的未格式化可用空间, 40G的windows10分区, 以及一个800M的disk0s4额外分区(Microsoft 保留或者Windows 恢复分区).

使用diskutil工具查看分区表

1
2
3
4
5
6
7
8
9
10
11
12
13
14
15
16
17
╰─ diskutil list
/dev/disk0 (internal):
#: TYPE NAME SIZE IDENTIFIER
0: GUID_partition_scheme 251.0 GB disk0
1: EFI EFI 314.6 MB disk0s1
2: Apple_APFS Container disk1 201.4 GB disk0s2
3: Microsoft Basic Data BOOTCAMP 39.8 GB disk0s3
4: Windows Recovery 892.3 MB disk0s4

/dev/disk1 (synthesized):
#: TYPE NAME SIZE IDENTIFIER
0: APFS Container Scheme - +201.4 GB disk1
Physical Store disk0s2
1: APFS Volume Macintosh HD 166.1 GB disk1s1
2: APFS Volume Preboot 22.7 MB disk1s2
3: APFS Volume Recovery 517.8 MB disk1s3
4: APFS Volume VM 3.2 GB disk1s4

这里注意到8G的未格式化可用空间的分区在分区表中找不到.

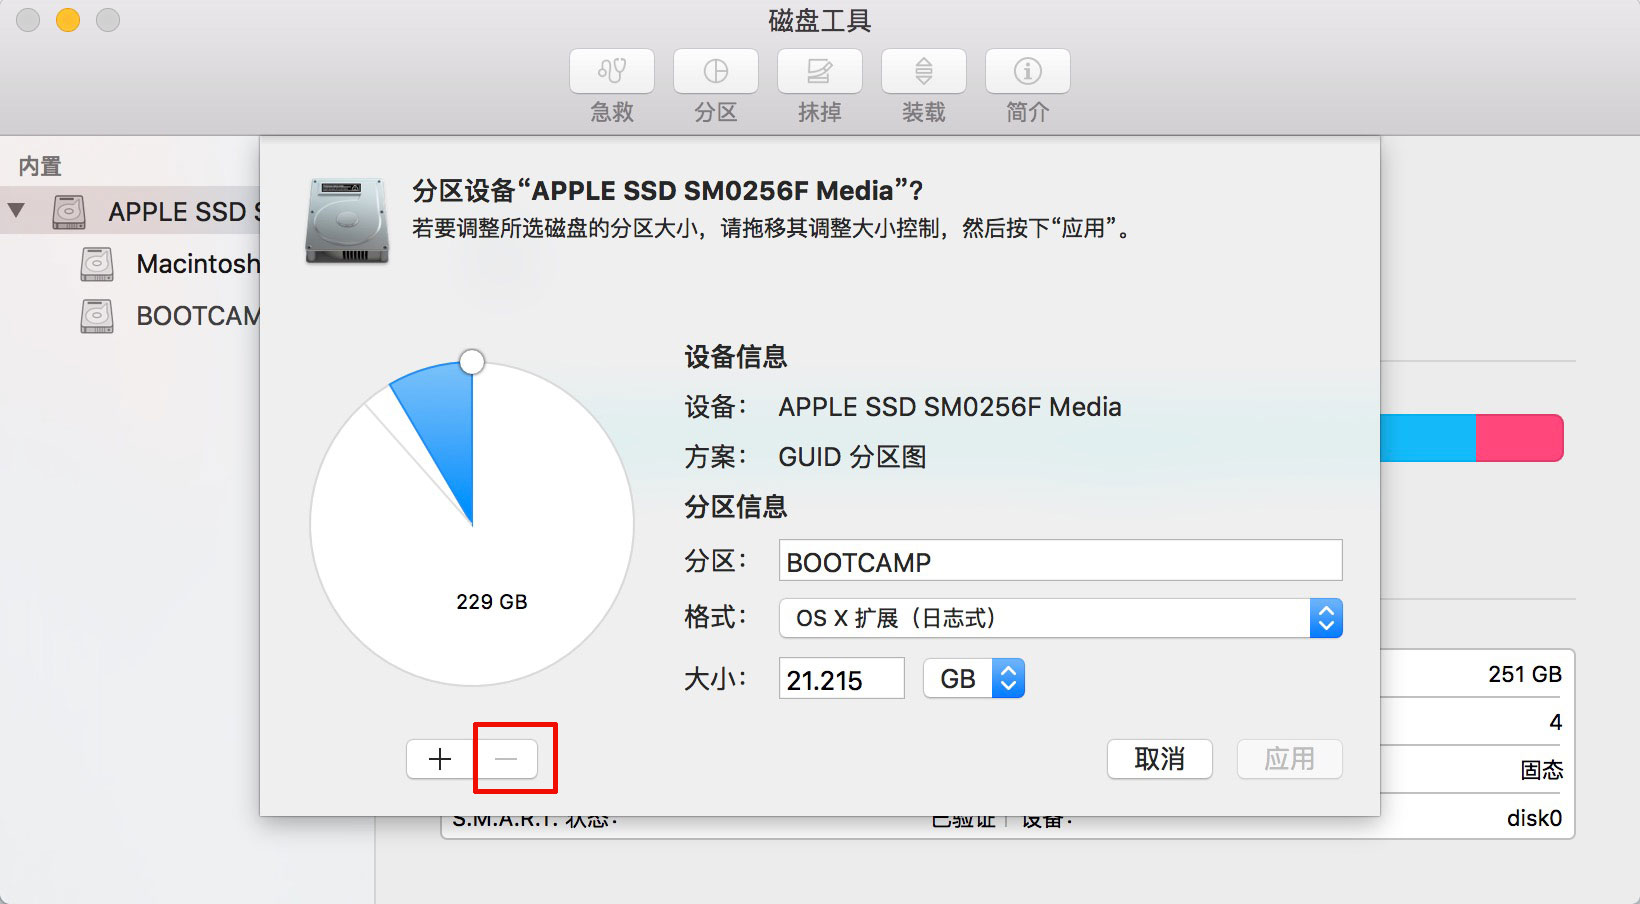
这里也决定了我按照官方的操作方法无法成功. 在磁盘工具分区里删除选择disk04分区, 点击上图-号后, 应用里提示错误: 无法找到其中一个分区. 我推测这里应该是找不到8G空间那个分区导致无法使用磁盘工具正常删除disk0s4分区.

删除失败

diskutil eraseVolume

使用命令行工具删除disk0s4分区, 然后删除disk0s3分区(bootcamp分区). 这里顺序很重要.

1
2
3
4
5
6
7
8
9
10
11
12
13
14
15
16
╰─ sudo diskutil eraseVolume JHFS+ deleteme /dev/disk0s4
Password:
Started erase on disk0s4
Unmounting disk
Erasing
Initialized /dev/rdisk0s4 as a 851 MB case-insensitive HFS Plus volume with a 8192k journal
Mounting disk
Finished erase on disk0s4 deleteme

╰─ sudo diskutil eraseVolume JHFS+ deleteme /dev/disk0s3
Started erase on disk0s3 BOOTCAMP
Unmounting disk
Erasing
Initialized /dev/rdisk0s3 as a 37 GB case-insensitive HFS Plus volume with a 8192k journal
Mounting disk
Finished erase on disk0s3 deleteme

这时使用磁盘工具, 选择根卷分区, 选择disk0s4分区, 点击减号, 选择disk0s3分区, 点击减号. 可以成功合并原来disk0s4 disk0s3的空间.

1
2
3
4
5
6
7
8
9
10
11
12
13
14
15
16
╰─ diskutil list
/dev/disk0 (internal):
#: TYPE NAME SIZE IDENTIFIER
0: GUID_partition_scheme 251.0 GB disk0
1: EFI EFI 314.6 MB disk0s1
2: Apple_APFS Container disk1 201.4 GB disk0s2
3: Apple_HFS deleteme 40.5 GB disk0s3

/dev/disk1 (synthesized):
#: TYPE NAME SIZE IDENTIFIER
0: APFS Container Scheme - +201.4 GB disk1
Physical Store disk0s2
1: APFS Volume Macintosh HD 166.1 GB disk1s1
2: APFS Volume Preboot 22.7 MB disk1s2
3: APFS Volume Recovery 517.8 MB disk1s3
4: APFS Volume VM 2.1 GB disk1s4

这时已经将bootcamp分区 disk0s3 格式化成 HFS+ 格式. 但是由于那个8G空间分区无法在分区表中找到. 始终无法使用磁盘工具将8G空间分区和bootcamp分区合并到mac APFS分区中.

diskutil mergePartitions

根据网上找到的资料, 开始作死使用diskutil mergePartitions命令尝试合并分区.

1
2
3
4
5
6
7
8
9
10
11
12
13
14
15
16
17
18
19
20
21
22
23
24
25
26
╰─ diskutil mergePartitions --help
Usage: diskutil mergePartitions [force] format name
DiskIdentifier|DeviceNode DiskIdentifier|DeviceNode
Merge two or more pre-existing partitions into one. The first disk parameter
is the starting partition; the second disk parameter is the ending partition;
this given range of two or more partitions will be merged into one.
All partitions in the range, except for the first one, must be unmountable.
All data on merged partitions other than the first will be lost; data on the
first partition will be lost as well if the "force" argument is given.
If "force" is not given, and the first partition has a resizable file system
(e.g. JHFS+), it will be grown in a data-preserving manner, even if a different
file system is specified (in fact, your file system and volume name parameters
are both ignored in this case). Also, if "force" is not given, and the first
partition is not resizable, you will be prompted if you want to erase.
However, if "force" is given, the first partition is always formatted. You
should do this if you wish to reformat to a new file system type.
Merged partitions are required to be ordered sequentially on disk.
See `diskutil list` for the actual on-disk ordering; BSD slice identifiers
may in certain circumstances not always be in numerical order but the
top-to-bottom order given by diskutil list is always the on-disk order.
Ownership of the affected disk is required.
Example: diskutil mergePartitions JHFS+ NewName disk3s4 disk3s7
This example will merge all partitions *BETWEEN* disk3s4 and disk3s7,
preserving data on disk3s4 but destroying data on disk3s5, disk3s6,
disk3s7 and any invisible free space partitions between those disks;
disk3s4 will be grown to cover the full space if possible.

发现无法成功

1
2
3
4
5
6
╰─ diskutil mergePartitions APFS randall disk0s2 disk0s3
You cannot merge disks into an APFS Physical Store
Instead, you can delete the partitions following the APFS Physical Store by
using "diskutil eraseVolume free n <disk>" for all such partitions, and
then by growing the corresponding APFS Container by its APFS Physical Store
to fill the gap by using "diskutil apfs resizeContainer disk0s2 0"

diskutil apfs resizeContainer

不得不赞mac命令行工具的提示真的做得非常好, 在这里发现了关键性的信息:

1
APFS格式分区可以使用diskutil apfs resizeContainer命令自动扩展空间到下一个可用分区.

8G空间分区本身是未格式化的, 符合要求.

1
2
3
4
5
6
7
8
9
10
11
12
13
14
15
16
17
18
19
20
21
22
23
24
25
26
27
28
29
30
31
32
33
34
35
36
37
38
39
40
41
42
43
44
45
╰─ diskutil apfs resizeContainer disk0s2 0
Started APFS operation
Aligning grow delta to 8,650,686,464 bytes and targeting a new physical store size of 210,007,728,128 bytes
Determined the maximum size for the targeted physical store of this APFS Container to be 210,007,728,128 bytes
Resizing APFS Container designated by APFS Container Reference disk1
The specific APFS Physical Store being resized is disk0s2
Verifying storage system
Using live mode
Performing fsck_apfs -n -x -l /dev/disk0s2
Checking volume
Checking the container superblock
Checking the EFI jumpstart record
Checking the space manager
Checking the object map
Checking the APFS volume superblock
Checking the object map
Checking the fsroot tree
Checking the snapshot metadata tree
Checking the extent ref tree
Checking the snapshots
Checking the APFS volume superblock
Checking the object map
Checking the fsroot tree
Checking the snapshot metadata tree
Checking the extent ref tree
Checking the snapshots
Checking the APFS volume superblock
Checking the object map
Checking the fsroot tree
Checking the snapshot metadata tree
Checking the extent ref tree
Checking the snapshots
Checking the APFS volume superblock
Checking the object map
Checking the fsroot tree
Checking the snapshot metadata tree
Checking the extent ref tree
Checking the snapshots
Verifying allocated space
The volume /dev/disk0s2 appears to be OK
Storage system check exit code is 0
Growing APFS Physical Store disk0s2 from 201,357,041,664 to 210,007,728,128 bytes
Modifying partition map
Growing APFS data structures
Finished APFS operation

运行成功, 打分磁盘工具, 查看根卷分区, 发现8G空间分区已经被合并至APFS分区, 只剩下一个40G的bootcamp分区.

选择bootcamp分区, 点击减号, 应用成功. 成功将所有分区合并成一个完整大分区.

现在Mac只有一个分区了.

1
2
3
4
5
6
7
8
9
10
11
12
13
14
15
╰─ diskutil list
/dev/disk0 (internal):
#: TYPE NAME SIZE IDENTIFIER
0: GUID_partition_scheme 251.0 GB disk0
1: EFI EFI 314.6 MB disk0s1
2: Apple_APFS Container disk1 250.7 GB disk0s2

/dev/disk1 (synthesized):
#: TYPE NAME SIZE IDENTIFIER
0: APFS Container Scheme - +250.7 GB disk1
Physical Store disk0s2
1: APFS Volume Macintosh HD 168.9 GB disk1s1
2: APFS Volume Preboot 22.7 MB disk1s2
3: APFS Volume Recovery 517.8 MB disk1s3
4: APFS Volume VM 2.1 GB disk1s4

Done.


参考: BOOTCAMP 分区无法删除

如何使用sqlalchemy构造SQL语句

发表于 2018-05-05 | 评论数:
本文字数: 1.8k | 阅读时长 ≈ 2 分钟

sqlalchemy作为ORM层工具可以方便地编程式操作数据库, 但有时与外部系统交互时需要生成raw sql语句, 利用sqlalchemy可能方便地动态构造成sql语句.

假设我们有两个类代表User, Address两张表.

1
2
3
4
5
6
7
8
9
10
11
12
13
14
15
16
17
18
19
20
21
22
23
24
25
26
from sqlalchemy.ext.declarative import declarative_base

Base = declarative_base()

from sqlalchemy import Column, Integer, String
from sqlalchemy import ForeignKey
from sqlalchemy.orm import relationship


class User(Base):
__tablename__ = 'users'

id = Column(Integer, primary_key=True)
name = Column(String)
fullname = Column(String)
password = Column(String)


class Address(Base):
__tablename__ = 'addresses'

id = Column(Integer, primary_key=True)
email_address = Column(String, nullable=False)
user_id = Column(Integer, ForeignKey('users.id'))

user = relationship("User", lazy=False)

利用Query构造生需要的语句, 使用compile[1]输出query代表的sql语句.

1
2
3
4
5
6
from sqlalchemy.orm import Query

filters = {'user_id': 1}
query = Query(Address).filter_by(**filters)
query = query.statement.compile(compile_kwargs={'literal_binds': True})
print query

输出

1
2
3
SELECT addresses.id, addresses.email_address, addresses.user_id, users_1.id, users_1.name, users_1.fullname, users_1.password
FROM addresses LEFT OUTER JOIN users AS users_1 ON users_1.id = addresses.user_id
WHERE addresses.user_id = 1

注意输出中包含了Address.user字段代表的join操作, 如果不需要这些字段可以lazyload[2]取消.

1
2
3
4
5
6
7
from sqlalchemy.orm import lazyload

filters = {'user_id': 1}
query = Query(Address).filter_by(**filters)
query = query.options(lazyload('*'))
query = query.statement.compile(compile_kwargs={'literal_binds': True})
print query

输出

1
2
3
SELECT addresses.id, addresses.email_address, addresses.user_id
FROM addresses
WHERE addresses.user_id = 1

  1. How do I render SQL expressions as strings, possibly with bound parameters inlined? ↩

  2. Controlling Loading via Options ↩

Python项目入门培训文档

发表于 2017-09-02 | 评论数:
本文字数: 7.5k | 阅读时长 ≈ 7 分钟

Intro

本篇文档是由近期给公司校招的新人(没有Python背景)准备的培训资料整理而来,学习计 划以学员的自学为主。根据实践平均每周学员需要花费1-2天的时间,每周再加上一个小时 跟踪和讲解相关内容。

教程并不是单纯的Python语言培训,侧重点在于让新人快速参与项目开发。

Python学习计划

受众

假定学员熟悉基本的编程概念,使用过Java/C/C++其中一门语言,有一定项目开发经验

目标

预计为期8周的阅读及学习计划,以完成每周设定的任务的方式引导学习Python语言以及 相关开发知识,帮助学员进行Python项目开发

需要完成的任务包括:

  • 完成参考资料的阅读(扩展阅读不作要求)
  • 完成一些具体的编程练习
  • 阅读一些库的文档并编写例子初步掌握使用

进度反馈及跟踪

每周会有例会跟踪进度,平时的反馈我们可以通过邮件交流

randall.wjz@gmail.com

第1周 Intro

本周目标

在开始学习Python语言的具体知识细节前了解一些背景知识,以及设置一个Python开发环境

请完成以下材料的阅读

背景知识了解

  1. 简单的Python历史介绍

    人生苦短,我用Python

  2. Python语言的设计哲学

    • The Zen of Python
    • 中文翻译参考
    1
    2
    3
    4
    5
    6
    7
    8
    9
    10
    11
    12
    13
    14
    15
    16
    17
    18
    19
    20
    21
    The Zen of Python, by Tim Peters

    Beautiful is better than ugly.
    Explicit is better than implicit.
    Simple is better than complex.
    Complex is better than complicated.
    Flat is better than nested.
    Sparse is better than dense.
    Readability counts.
    Special cases aren't special enough to break the rules.
    Although practicality beats purity.
    Errors should never pass silently.
    Unless explicitly silenced.
    In the face of ambiguity, refuse the temptation to guess.
    There should be one-- and preferably only one --obvious way to do it.
    Although that way may not be obvious at first unless you're Dutch.
    Now is better than never.
    Although never is often better than right now.
    If the implementation is hard to explain, it's a bad idea.
    If the implementation is easy to explain, it may be a good idea.
    Namespaces are one honking great idea -- let's do more of those!
  3. Python社区

    • 社区
    • PEP,中文翻译为Python增强提议。这个词经常在Python学习过程中看到,了解什么是PEP
    • PSF,Python Software Foundation, Python软件基金会
    • PyCon, 每年社区举办的Python开发者大会,youtube上可以找到与会演讲视频
  4. 了解Python2和Python3的现状

    • Should I use Python 2 or Python 3 for my development activity?
    • Python2版本将于2020年正式停止更新维护,Python语言的未来以及最新改进在Python3版本上进行
    • 新项目应该默认使用Python3进行开发
    • 现存的大量项目以及第三库使用Python2版本,流行的Python库大多兼容Python2/3版本
    • 目前公司的项目使用Python2版本

编程环境设置

  1. 选择Python解释器

    Picking an Interpreter

  2. 安装Python

    Properly Installing Python

  3. 了解pip

    Python的包管理工具,类比Java语言的Maven工具

    • pip包管理器使用详解
    • 文档
  4. IDE & Editor

    项目组使用PyCharm进行Python开发,请下载安装并熟悉使用

    • 介绍
    • 官网

    前端项目使用VS Code作为开发环境

    • Why Visual Studio Code? - 为什么选用VSCode
    • 官网

编程练习

  • 在本地安装设置好Python2.7开发环境
  • 使用pip安装requests库,参考资料
  • 安装并设置好PyCharm
  • 使用PyCharm建立项目,编写程序使用requests使用GET请求访问 http://www.bing.com 并输出内容,参考资料

扩展阅读

  • Python流行的第三方库支持Python3的情况
  • 前端项目使用JavaScript Standard Style 作为代码风格标准
  • pythonclock

第2周 开始Python学习

本周目标

本周将进行为期三周的Python语言学习,每周将指定的一些练习题目,请尝试完成(来源于Python Koan项目)。

阅读材料中将列出一些参考的Python学习教程,学员会有比较充足的时间进行自由的学习。

Python Koan项目

Python Koan是通过TDD进行Python学习的一个项目,项目地址 请下载并按照文档设置,注意我们使用python2文件夹下的代码

每个题目都关于Python语言的一个特性,完成题目可以帮助掌握这个特性。 如遇到题目涉及到的教程中没有提及的概念,可以跳过。 Python Koan 答案参考 (注意此答案使用Python3版本)

阅读材料

快速入门

  • 写给有经验程序员的Python入门教程 快速了解Python特性
  • Python 核心特性 Section 1-11

请完成以下教程

  • Welcome to Python for you and me (比较简洁,PEP8 Guidelines,Virtualenv及之后章节可跳过)

编程练习 | 本周的Python Koan题目

  • about~asserts~.py
  • about~strings~.py
  • about~none~.py
  • about~lists~.py
  • about~listassignments~.py
  • about~dictionaries~.py
  • about~stringmanipulation~.py
  • about~tuples~.py
  • about~methods~.py
  • about~controlstatements~.py
  • about~trueandfalse~.py
  • about~sets~.py

第3周 继续Python Koan题目

本周目标

阅读材料

请完成以下教程

  • Python官方入门教程 (阅读2-9章节即可)

编程练习 | 本周的Python Koan题目

  • about~triangleproject~.py
  • about~exceptions~.py
  • about~triangleproject2~.py
  • about~iteration~.py
  • about~comprehension~.py
  • about~generators~.py
  • about~lambdas~.py
  • about~scoringproject~.py
  • about~classes~.py
  • about~newstyleclasses~.py
  • about~withstatements~.py
  • about~monkeypatching~.py
  • about~diceproject~.py
  • about~methodbindings~.py

第4周 decorator and context manager

本周目标

相信大家对编程语言中的基于数据和基于函数的抽象都不陌生,现在来看一下Python对于基于语法的抽象的支持。

  • 了解Python中装饰器(decorator)的概念
  • 了解Python中上下文管理器(context manager)的概念

阅读材料

  • 装饰器 简短介绍
  • A guide to Python's function decorators
  • 上下文管理器 简短介绍
  • Python in the real world: Context Managers

编程练习 | 本周的Python Koan题目

  • about~decoratingwithfunctions~.py
  • about~decoratingwithclasses~.py
  • about~inheritance~.py
  • about~multipleinheritance~.py
  • about~scope~.py
  • about~modules~.py
  • about~packages~.py
  • about~classattributes~.py
  • about~attributeaccess~.py
  • about~deletingobjects~.py
  • about~proxyobjectproject~.py
  • about~proxyobjectproject~.py
  • about~extracredit~.py
  • about~regex~.py

扩展阅读

  • 标准库中的context manager工具

参考书目

学习了两个教程之后对Python语言已经有大致的了解,接下来如果需要深入学习,建议找一些严肃的书籍进行系统性的学习。

  • python books
  • 学习Python资源
  • Best Python Resources Full Stack Python 本身也是很好的学习资源

第5周 编程风格与命令行开发

本周目标

了解Python编程风格及命令行开发工具.

Python code style 业界现在有两个标准,PEP8 以及 Google Python Style Guide 项目组采用PEP8标准,对于Google Style可以稍作了解

除了日常在IDE里进行Python开发,开发人员也应该掌握一些在命令行环境下进行编程和debug的技能

阅读材料

  • 代码风格 英文版
  • 虚拟环境 virtualenv
  • Pip和Virtualenv的更多配置
  • PEP8 建议阅读这个美化过的排版,原版地址
  • yapf Google 出品的自动化格式代码工具,建议了解一下

ipython

  • 官网

  • 作为一个交互式shell, 用来代替默认的python命令行编程环境

    1
    2
    # 使用以下命令安装python2.7版本的ipython
    pip install 'ipython<=6.0.0'

pdb

Python debuger, 交互式debug环境。类似于GDB

  • 使用教程

vim

命令行环境下的编辑器

  • 交互式的VIM简短教程 十分炫酷的简短教程,掌握日常用到的最基本操作

编程练习

本周没有具体的编程练习,请花一点时间熟悉一下pip/virtualenv/ipython/pdb/vim工具。

编辑器/IDE是非常重要的工具,在工作过程中几乎所有的开发时间都花这上面,所以不 论你喜欢vim/emacs/vs code/atom/sublime text,你应该熟悉你的编程器/IDE。花些时间去了解 你喜欢的编程器/IDE

适当设置好开发环境对于提高开发效率也相当重要,有兴趣可以了解一下扩展阅读里列出的工具

扩展阅读

  • 你的开发环境 英文版
  • Mac 开发配置手册

windows开发环境

个人推荐 Cygwin + ConEmu + zsh + oh-my-shell + CoreUtils

  • Cygwin
  • ConEmu
  • 终极Shell 在Cygwin环境中也可以使用zsh + oh-my-zsh
  • CoreUtils for Windows 常用的liunx命令windows移植
  • 配置豪华的 Windows 开发环境

第6周 标准库及其它

本周目标

大概了解下Python标准库, 一些第三库/框架

阅读材料

标准库

  • Python标准库——走马观花
  • Python标准库01 正则表达式 (re包)
  • Python标准库03 路径与文件 (os.path包, glob包)
  • Python标准库04 文件管理 (部分os包,shutil包)
  • Python标准库06 子进程 (subprocess包)
  • Python标准库08 多线程与同步 (threading包)

常用库

  1. Oslo

    Oslo 是由openstack项目衍生出来的一系列python库,为openstack众多项目提供统一的公共功能。

    To produce a set of python libraries containing code shared by OpenStack projects. The APIs provided by these libraries should be high quality, stable, consistent, documented and generally applicable

    • 官方Wiki Oslo库列表

    阅读使用和配置文档,大概了解这些包是用做什么的即可。

    • oslo.cache
    • oslo.concurrency
    • oslo.config
    • oslo.log
    • oslo.policy
    • pbr
  2. SQLAlchemy

    SQLAlchemy 是一个连接数据库的ORM框架 大概了解 SQLAlchemy 的简单使用方式,不要求深入了解

    • 官网
    • 简单介绍
    • 简单使用教程

第7周 开源工具

本周目标

了解一些开源工具及项目开发协作相关工具

由于列出的工具较多,不要求深入了解

阅读材料

Markdown

Markdown语法 平时写文档时可以使用Markdown语法

示例网站 https://maxiang.io/ 可以看到左边为文本内容,右边为渲染后的效果。使用markdown语法,书写文档时不需 要关心排版效果,可以专注于内容本身。

Git && Gerrit

项目组使用Git进行代码版本管理,使用Git是一项必备技能。如果以前没有使用Git的 经验,请务必花一些时间学习。

  • 版本控制Git和代码审阅Gerrit
  • Git教程
  • Gerrit Code Review - A Quick Introduction

Jenkins && CI

  • Jenkins与持续集成(CI)介绍

tox

  • Python 的单元测试之 tox
  • tox官网介绍

运维利器 Ansible

自动化运维工具,可以稍作了解,日常工作中可能会用到ansible工具来批量运行脚本

  • Ansible 简介 阅读简介至ad-hoc部分即可
  • Ansible中文权威指南 如果有兴趣深入了解

第8周 实战

本周目标

本周为编程练习,创建一个Python项目,并编程完成要求

这个项目是完成一个命令行工具,可以通过命令行调用来完成数据库表的CUDR操作

编程练习

申请虚拟机作为开发机,要求CentOS7.2系统

配置pip文件

安装并配置PostgreSQL数据库

tips: 可以使用 NaviCat pgAdmin 等数据库管理工具

配置数据库密码为 test123456

创建database, 名称: cudr

在 cudr 新建表,表名example

创建 sql 如下

1
2
3
4
5
6
7
8
DROP TABLE IF EXISTS "public"."example";
CREATE TABLE "public"."example" (
"name" varchar(127) COLLATE "default" NOT NULL,
"code" varchar(63) COLLATE "default" NOT NULL
)
WITH (OIDS=FALSE)
;
ALTER TABLE "public"."example" ADD PRIMARY KEY ("name");

创建一个Python项目

项目名称 cudr

项目结构请阅读结构化你的工程 中仓库的结构一节,关于 Django Applications及之后的章节可跳过

在 requirements.txt 文件中指定项目依赖库

1
2
sqlalchemy
click

使用pip安装依赖

1
pip install -r requirements.txt
  1. click 用于创建命令行工具

    • 官网
    • 简单使用教程
  2. sqlalchemy 数据库ORM工具

编程

在 cudr/core.py 中完成具体的代码工作

具体代码实现以及命令行使用参数的设计可以自由发挥

最终效果要求可以完成类似以下功能(不要求和下面示例代码中一样)

  • 创建
  • 读取
  • 修改
  • 删除
1
2
3
4
5
6
7
8
# 创建一个数据库记录
python core.py --create name1 code1
# 读取
python core.py --read name1
# 修改 指定主键name1及更新的字段及字段的新值
python core.py --update name1 name=name2
# 删除
python core.py --delete name2

Python重构代码的一些模式

发表于 2017-08-26 | 更新于 2017-08-30 | 评论数:
本文字数: 3.5k | 阅读时长 ≈ 3 分钟

以下介绍一些python idiom,每当你在代码库中看到以下的模式可以参照以下的建议进行重构,让代码变得更加的pythonic,可读性更好,更容易维护。

代码示例Python版本为2.7

enumerate

需要使用列表的下标时,不要使用C风格的下标遍历

1
lst = ['a', 'b', 'c']
1
2
3
4
5
6
7
8
9
# DON'T
i = 0
for i in lst:
print i, '-->', lst[i]
i += 1

# OR
for i in range(len(lst)):
print i, '-->', lst[i]
1
2
3
# DO
for idx, item in enumerate(lst):
print idx, '-->', item

zip/izip

同时遍历两个列表时,不要使用C风格的下标遍历

1
2
lst1 = ['a', 'b', 'c']
lst2 = [1, 2, 3]
1
2
3
4
# DON'T
for i in range(len(lst1)):
print lst1[i]
print lst2[i]
1
2
3
4
# DO
for lst1_item, lst2_item in zip(lst1, lst2):
print lst1_item
print lst2_item
1
2
3
4
5
6
# BETTER
# 不需要在内存中生成包含lst, lst2的第三个列表
from itertools import izip
for lst1_item, lst2_item in izip(lst1, lst2):
print lst1_item
print lst2_item

unpacking tuple

swap

1
2
x = 10
y = -10
1
2
3
4
# DON'T
tmp = x
x = y
y = tmp
1
2
# DO
x, y = y, x

get element from tuple

1
words = ['apple', 'banana', 'cat']
1
2
3
# DON'T
foo = words[0]
bar = words[1]
1
2
# DO
foo, bar, _ = words # 使用 _ 如果你不需要这个值

Dict.setdefault/defaultdict

处理字典中key不存在时的默认值

1
2
3
# group words by frequency
words = [(1, 'apple'), (2, 'banana'), (1, 'cat')]
frequency = {}
1
2
3
4
5
# DON'T
for freq, word in words:
if freq not in frequency:
frequency[freq] = []
frequency[freq].append(word)
1
2
3
# DO
for freq, word in words:
frequency.setdefault(freq, []).append(word)

如果你知道自己在做什么,use defaultdict

1
2
3
4
5
# BETTER
from collections import defaultdict
frequency = defaultdict(list)
for freq, word in words:
frequency[freq].append(word)

Dict.iteritems

遍历字典

1
words = {'apple': 1, 'banana': 2, 'cat': 3}
1
2
3
# OK
for word in words:
print word, '-->', words[word] # 需要计算word的hash值
1
2
3
# GOOD
for word, freq in words.items():
print word, '-->', freq
1
2
3
4
# BETTER
# 不需要在内存中生存包含words所有元素的中间结果
for word, freq in words.iteritems():
print word, '-->', freq

for...else

break and nobreak

使用for...else模式处理遍历列表时搜索符合某些条件的元素break以及搜索不到符合条件元素时的情况。

有些人会认为for...else的语义让人迷惑所以不建议使用,但是正确地使用for...else模式会让代码的结构更加清晰。

1
2
3
# search if a word match some condition exists
words = ['apple', 'banana', 'cat']
condition = lambda word: len(word) == 1
1
2
3
4
5
6
7
8
9
# DON'T
found = False
for word in words:
if condition(word):
print 'Found'
found = True
break
if not found:
print 'Not found'
1
2
3
4
5
6
7
8
9
# DO
for word in words:
if condition(word):
# 处理存在符合condition的元素的情况
print 'Found'
break
else:
# 处理没有符合condition元素的情况
print 'Not found'

else在for...else语法里的语义是如果没有break发生,也即是列表被完全遍历的情况。代码清晰地分成了两部分,你可以明确地看到他们属于同一个结构。

for...else语法让人迷惑的地方就是在于else这个名字,根据python核心开发者Raymond Hettinger的说法,如果他们有机会回到过去修改这一语法的话,他们会将else修改为nobreak。

事实上如果不需要处理搜索到符合condition元素时的情况,只需要检查符合condition元素是否存在时,使用any

1
2
3
existed = any(map(condition, words))
if not existed:
print 'Not found'

try...except...else

分开异常处理与正常情况

try...except语法大家都不陌生,大多数情况下简单地使用地try...except...else语法将臃肿的try block重构就可以让代码的结构更加清晰,将异常处理和正常情况清晰地区分开来。

1
2
3
4
5
6
7
8
9
10
11
import json

def get_external_json():
return "maybe valid json, maybe some plain text of error"

def do_something_with(result):
print result

def handle_error(e):
# maybe log exception trace
print 'Oops'
1
2
3
4
5
6
# GOOD
try:
result = json.loads(get_external_json())
do_something_with(result)
except Exception as e:
handle_error(e)
1
2
3
4
5
6
7
8
9
10
# BETTER
try:
# 异常可能抛出点
result = json.loads(get_external_json())
except Exception as e:
# 异常处理
handle_error(e)
else:
# 正常情况
do_something_with(result)

try...except...else这个结构清晰地区分了异常可能的抛出点,异常处理及正常情况三种情况。

12345
Randall Wang

Randall Wang

Just another coder . Heavy Emacs user

22 日志
16 标签
RSS
GitHub
0%
© 2022 Randall Wang
由 Hexo 强力驱动 v3.8.0
|
主题 – NexT.Gemini v7.0.0